Tomorrow is the first day of Spring and the weather has been so warm that I'm feeling extra excited about the change in seasons. Normally, I just go shopping for Spring fashion, like colorful bags, white dresses and pretty bangles–but this year I'm also thinking cool Spring crafts!
With all of the pretty flowers that have been popping up everywhere (and the cherry blossom festival coming up), I want to bring some of the natural beauty outside into my home to share with my family.
I'm going to light up the living room with an adorable pastel-colored paper flower lantern, adorn the family room with some light up cherry blossom branches and put a super easy homemade bird feeder outside of the kitchen window. The best part? These DIY projects are so easy that you can get the kids involved, too.
Read more ¿Qué más? Teach the kids about your home country with this easy DIY project.

Paper Flower Lantern (DIY project courtesy of Sparkle Pants Girl)
Materials:
Cardstock
Hot glue gun
Paper lantern
Cutting machine
Some sparkly rhinestones
Baker's twine
Instructions:
1. Using my Silhouette machine I cut out some of their 3D Ruffled Flowers, that I downloaded from the online store. Okay, not just some flowers, but 56 ruffled flowers. Each ruffled flower has six pieces. If you are a little crazy and have lots of time, I suppose you could cut all these out by hand, but your hands would start to hurt after a while.
2. Crumple up each layer individually in the palm of your hand, then glue the layers together. You can glue a rhinestone in the middle, if you'd like.
3. Grab your lantern and start gluing the flowers on. I used a 99 cent paper lantern from Ikea. Start gluing at the bottom of the lantern, working your way up and keeping the flowers even. I didn't do that and I ended up having to reposition some of the flowers. Not so fun.
4. Hang the lantern using your baker's twine and enjoy the colors!
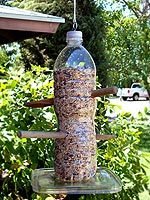
Backyard Bottle Bird Feeder (DIY project courtesy of Disney's Family Fun)
Materials:
Clean 1-liter soda bottle
Craft knife
2 wooden spoons
small eye screw
Length of twine for hanging
Instructions:
1. Start by drawing a 1/2-inch asterisk on the side of a clean 1-liter soda bottle, about 4 inches from the bottom. Rotate the bottle 90 degrees and draw another asterisk 2 inches from the bottom. Draw a 1-inch-wide circle opposite each asterisk, as shown.
2. Use a craft knife to slit the asterisk lines and cut out the circles (a parent's job). Insert a wooden spoon handle first through each hole and then through the opposite asterisk, as shown.
3. Remove the bottle cap and twist a small eye screw into the top of it for hanging.
4. Finally, fill your feeder with birdseed, recap it, and use a length of twine to hang it from a tree.
Read more ¿Qué más? Make Spring Cleaning fun with these colorful organizing tools.
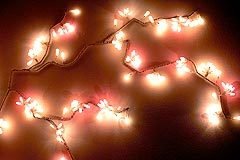
Cherry Blossom Lights (DIY project courtesy of Instructables.com)
Materials:
White LED Christmas lights (battery powered) -you can pick these up on sale after Christmas
Tissue paper (shades of white and pink) -you can reuse old tissues from gift bags
a Branch (I used dollar store flowers, though a real tree branch will do)
Floral stem wrap tape (brown)
Vase
Sand/ gravel or small stones
Twist ties
Glue (glue stick and craft glue)
Pliers
Scissors/rotary cutting tool
Instructions:
1. I trimmed off the flowers and excess twigs from the branch so that I can spread the lights out evenly. Starting from the bottom attach the LED wires to the branch with twist ties. Try to arrange the lights evenly along the branch with the battery pack at the bottom and the wires pulled taut.
2. I used four layers of tissue paper, two white and two pink. You can try more layers of tissue or different colour combinations. Cut the 4 ply paper into squares 3 by 3 inches in size, you need one for each LED.
3. Fold each square (with the 4 layers of tissue) in half. Fold the half square into a cone, lining up the edges. With scissors cut a half circle off the top of the cone to form the blossom (see images above for guidance). Glue the four layers of tissue paper together with a glue stick (just put glue at the centre of the blossoms, leave the petals separate) and poke a hole in the centre.
4. The cheap dollar store flowers that I was using had a plastic stamen at the centre. I was able to fit it on the tip of the LEDs so that it diffused the light nicely. If you don't have anything like this on your flowers or if you are using a real branch and you would like to diffuse the light on your LEDs you can sand the surface or put a dab of glue on it. To assemble the blossoms on the branch, slip the hole of the blossom through the LEDs and secure on the branch with clear tape. I then glued the plastic stamen on. When the glue is dry ruffle up the layers of tissue paper so that they resemble a real cherry blossom.
5. Wrap with floral stem tape beginning from the base of the blossoms down the branch. Pull the tape taut and try not to layer it too thickly. Cover the branch and light wires all the way down to the battery pack.
6. Place the branch and battery pack into the vase and begin pouring the gravel around it. Cover the battery pack with gravel but make sure you have access to the switch. It would have been more convenient if the switch for my battery pack had been at the top, instead it was on the top edge so I left that area uncovered. Unfortunately, I will also need to pull the whole thing out when I change the batteries.
Are you excited for Spring and making some adorable crafts with the family?
Images via Sparkle Pants Girl, careyelaine/flickr, sum2004/flickr